
Sometimes there are images I want to put in my posts that show other people’s children, or tell-tale signs of school uniform logos etc, and I really wanted to pixelate images to prevent privacy being compromised.
I use Picmonkey for all of my blog post collages, as I find them very easy and simple to use. It took me a while to get the formatting right for me, so today I wanted to share with you how to pixelate your images quickly and easily.
- Open PicMonkey – select EDIT which will allow you to choose a photo to upload

- The left hand side of the screen shows a list of options. Choose the second command from the top (EFFECTS) which looks like a magic wand.

- This opens up a large list of options. Scroll down to almost the bottom until to find the section titles AREA.

- Choose the third option down – FOCAL PIXELATE
- Immediately you will see your photo has a circle in the centre. The image inside the circle will be clear and outside will be slightly blurry now. We are going to edit using the options to get the correct part of your photo pixelated.

- Using the options on the left hand side, we’re going to click the box that says REVERSE EFFECT. This will mean that the inner circle will become pixelated.
- I am going to pixelate Hubby’s face and leave 7yo clearly showing in the photo.
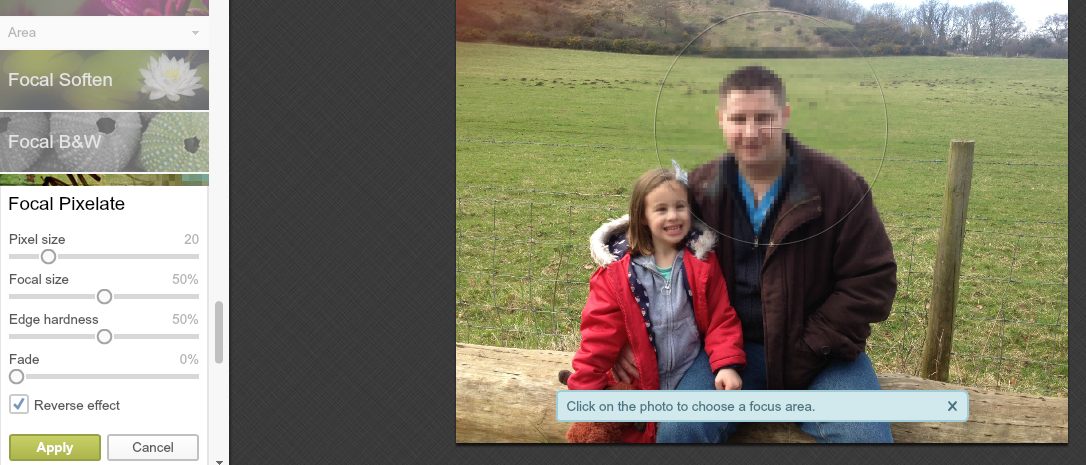
- As you can see Hubby’s face is now blurry. You can tweak all the options on the left hand side to make the pixelated area smaller, or larger which is perfect for hiding a school logo, or a child’s face etc. You can change the sixe of the pixels to hide the features even more. Once you are happy with your pixelated area, click APPLY and then save you new image.
- The following settings

- Gave me this outcome

I have found this to be an invaluable tool when blogging, so I hope this helps you at some point in the future. Do you pixelate images?
I’ve never used them before but definitely will now. Great post, thank you for sharing!
I LOVE Picmonkey, such a fab tool!!
Great tip[. I need to do this more often
This is a great tutorial, thanks so much for sharing. I’ll definitely be using this for my pics!
That’s brilliant thanks for the great tips, I have often not used really great photos because I didn’t know how to pixelate.
How very clever! Thanks for the tip!
Really helpful, thanks
I love Pic Monkey, I use it every day x
Lovely tutorial, I love learning how to use new gadgets and this is a nice way to learn.
That’s great to know. I use Pic Monkey all the time but so far have not had a need to pixelate. No doubt I will though 🙂
I have never needed to use this but its great to know how to thankyou x
I never realised you could do this…….thank you
I used to use this technique a lot in the past, always when wanting to pixelate other people’s children. Good on you for sharing how.
Liska xx
A great tutorial – I’ve been pixelating images (where necessary) for years using Paint Shop Pro x
I love using PicMonkey and this has come in handy before! Love that you pixelated your hubby out LOL
I’ve never used Picmonkey before but heard people rave about it! 🙂
Is this part of the free Picmonkey? A very handy tool, if so. Thanks for sharing.
Great tutorial, always handy! I often cast aside pictures when I could do this!
great tip thanks lovely really useful!
I think that I barely touch the surface with the capabilities even the free picmonky package can do!
Very good tutorial thank you! 🙂
thanks for reading it, I hope you get some use from it.
This looks like a fantastic idea, thank you for sharing.